Saturday, May 10, 2008

Make your dynamic ip into static & Setup Vpn With Dsl Router.

Recently I had problems with VPN because I have DSL router and dynamic ip. And to create VPN you have to have static ip address, so users can access to your VPN server. So first of all there’s a question: how to make my dynamic ip static?
The answer is simple. You visit the site dyndns.org and create yourself an account. Then... you go to services, and select this option:

Dynamic DNS - A free DNS service for those with dynamic IP addresses.


You click on create hosts and then, you write on the blank text area how would you like to call your host. (so users can access your pc hostname)


So... the name is always the same so users can access the vpn server no matter what is the ip address.


how to make your computer VPN server, (in windows XP)?
1. Click Start > Control Panel.
2. In the Control Panel, open the Network Connections > Create New Connection
Then..

3. On the Welcome To The New Connection Wizard page, click Next.
4. On the Network Connection Type page select the Set Up An Advanced Connection option.
5. On the Advanced Connection Options page select the Accept Incoming Connections option and click Next.
6. On the Devices For Incoming Connections page, I don’t need to connect any devices I just click Next.

7. On the Incoming Virtual Private Network (VPN) Connection page, select the Allow Virtual Private Connections option and click Next.

8. On the User Permissions page, select the users that are allowed to make incoming VPN connections. Click Next.

9. On the Networking Software page click on the Internet Protocol (TCP/IP) entry and click the Properties button.

10. Then you select the range of ip addresses you like to assign.

11. On the Completing The New Connection Wizard page, click Finish to create the connection.

There is a slight difference in creating connection in Windows 2003 server, but the main steps are the same.

And the last thing is.. for the user who want to access this VPN server.

How to make a new VPN connection?

1.Click Start, click Control Panel, click Network and Internet Connections, and then click Network Connections.
2.Click Create a new connection, and then click Next.


3.Click Connect to the network at my workplace, and then click Next.
4.Click Virtual Private Network connection, and then click Next.
5.Type a descriptive name for your company, and then click Next.
6. Then on VPN server selection you write the host name of the VPN server
7. Click Finish.

And that’s it. This worked for me. Thanks to the dyndns.org I solved the problem.

Friday, May 2, 2008

Cisco IOS Commands


Q.How do I telnet to the router?


Choose "Start" -> "Run" and type:
telnet 192.168.1.1


Where 192.168.1.1 is the IP-adresse of the router


Q.How to enable telnet from the outside?

By default routers are configured to accept telnet on port 23 from the inside. In order to get telnet access from the outside, you need to create a NAT entry for this popores.

Connect to the router -> enable -> config. Type:

ip nat ins sou sta tcp 192.168.1.1 23 int dialer0 23000

Now you have outside telnet access on port 23000. NB. This also makes your router more open for hacker attack.


Q.How to go into privileged (enable) mode?

Connect to the router. After the initial password you are in user mode. The prompt will like Router>. This mode is mostly used to view statistics, though it is also a stepping-stone for logging into more privileged mode. You can only view and change the configuration of a Cisco router in privileged mode, which you enter by typing:

enable or en

After a succesfull login the prompt will have changed to Router#

To end Priviliged mode type:

disable


Q.How to go into configuration mode?
Connect to the router -> enable and type:

configure terminal or conf t

To end the config mode press +Z (^Z).

Remember to save any changes that are made by typing: write


Q.How to restart the router?

Connect to the router, go to enable mode and type:
reload

Press enter when prompted to confirm.


Q.How to view the configuration?

In enable mode type:

sh run or wr t


Q.How to configure timeout?
Connect to the router -> enable -> Config mode, type:


int dialer0
time abs


Q.How to change password ?

Connect to the router -> enable -> Config mode, type:

line vty 0 4
password
line con 0
password

To change the Enable password:

no enable secret
enable secret

Q.How to see the actual line speed?

Connect to the router and type:

sh dsl int atm0

How to see the external IP adresse
Connect to the router and type:

sh ip in br dial0


Q.How to set the time?
Connect to the router -> enable mode and type:

clock set 10:17:00 14 june 2001

The format is "hh:mm:ss day month year". NB. clock set ? does not show the correct format.


Q.How to run a HotLine server?
In config mode type :

ip nat ins sou sta tcp w.x.y.z 5500 int dialer0 5500
ip nat ins sou sta tcp w.x.y.z 5501 int dialer0 5501
ip nat ins sou sta tcp w.x.y.z 5502 int dialer0 5502
ip nat ins sou sta tcp w.x.y.z 5503 int dialer0 5503

Hvor w.x.y.z is the internal IP.


Q.How to view the NAT entries?
Connect to the router and type:

sh ip nat trans


How to add NAT entries?
Connect to the router -> enable -> Config mode. The format is:

ip nat inside source static interface dialer0

Protocol is either tcp or udp. I.e. a NAT entry for port 4000 to 192.168.1.10 is done by typing:

ip nat inside source static tcp 192.168.1.10 4000 interface dialer0 4000


Q.How to remove NAT entries?
Connect to the router -> enable mode -> Config mode. The format is:

no ip nat inside source static interface dialer0

I.e. the NAT entry for port 4000 to 192.168.1.10 removed by:

no ip nat inside source static tcp 192.168.1.10 4000 interface dialer0 4000

In some cases the command above will not be succesfull, because the entry is in use. If this is the case type the following before going into config mode.

clear ip nat translation *

Q.How to disable NAT and use multible external addresses?
To enable an external ip range - i.e. 212.52.72.184 - 191. Connect to the router -> enable mode -> Config mode and type:

int eth0
ip address 212.52.72.185 255.255.255.248

(Change the ip number to the external numbers that is desired)

end
write
reload

Login again and delete the access list that controls the access inside out
(decide what IP's that is given access through the router), in config mode:

no access-list 1
access-list 1 permit 212.52.72.184 0.0.0.255

Notice the subnet mask 0.0.0.255 is opposite and equals 255.255.255.0

To disable NAT completely on the inside

no ip nat inside
end
write
reload


This satisfy the requirement from some firewalls that the routers ip address have to be on the same network as the wan link on the firewall. Trafic to DMZ and firewall is now going directly through the router to the firewall.


Q.How to change the address where external traffic is routed to...!

By default most routers will route all external traffic to 192.168.1.2. If this is needs to be change to somethin else i.e. a firewall address. Connect to the router - > enable mode and type:

clear ip nat translation *
configure terminal
no ip nat inside source static 192.168.1.2
ip nat inside source static 192.168.0.2
write
reload

Q.How to copy configuration to a TFTP server?

Connect to the router -> enable mode

copy nvram tftp://xx.xx.xx.xx/config.cfg

This saves a configuration file to the TFTP server at ip xx.xx.xx.xx


Q.How to copy configuration from a TFTP server?

Connect to the router -> enable mode

copy tftp://xx.xx.xx.xx/config.cfg nvram

This loads a configuration file to the TFTP server at ip xx.xx.xx.xx


How to remove a configuration

Connect to the router -> enable mode

delete nvram

This removes all configuration parameters and returns the router/switch to factory default settings.


Q.How to back up the Cisco IOS?

Connect to the router -> enable mode and type :

sh flash

This will show the files stored in the flash memory.

System flash directory:
File Length Name/status
1 3641684 soho70-y1-mz.123-6.bin
[3641748 bytes used, 4746860 available, 8388608 total]
8192K bytes of processor board System flash (Read/Write)

In this case an image called soho70-y1-mz.123-6.bin

To back up this file type:

copy flash tftp://192.168.1.2/xxxxx.bin
Source filename [soho70-y1-mz.123-6.bin]?
Address or name of remote host [192.168.1.2]?
Destination filename [xxxxx.bin]?

Where 192.168.1.2 is the ip-address of the tftp server. When prompted for the source file name type the file name found using the sh flash command. xxxxxx.bin will be the file name the IOS is stored under on the server.


Q.How to restore or upgrade the Cisco Router IOS?

Connect to the router -> enable mode and type :

copy tftp://192.168.1.2/xxxxx.bin flash
Destination filename [xxxxx.bin]?
Accessing tftp://192.168.1.2/xxxxx.bin...

Where 192.168.1.2 is the ip-address of the tftp server and xxxxx.bin is the image in the tftp root. If you do not have enough room in the flash memory to store both copies the router will ask to erase the contents of the flash before writing the new file to the memory.


Q.How to set community strings?

Connect to the router -> enable mode - config mode and type:

snmp-server community XXXXX RO
snmp-server location YYYY
snmp-server contact ZZZZ
snmp-server enable traps tty

Where XXXXX is the community name that the software which is collecting the SNMP trap must use. YYYY and ZZZZ are optional.


Q.How to delete community strings?

Connect to the router -> enable mode - config mode and type:

no snmp-server community XXXXX RO


Q.How to limit the DHCP scope?

There are 2 ways to do this. The first and most difficult is done by connecting to the router -> enable mode - config mode and type:

ip dhcp pool
network
default-router
dns-server 212.54.64.170 212.54.64.171
lease 0 1

Default the routers IP is 192.168.1.1.

I.e. you only want to use the following address pool 192.168.1.32-192.168.1.63 (Not include).
The you have to change to 192.168.1.32 and tol 255.255.255.224.

This page can used to help you calculating the subnet for you address pool: Subnet calculator.

The second and much easier way is just to reserve some address in the existing DHCP scope. I.e. you don't want to use the IP from 192.168.1.40 tol 192.168.1.72. In config mode type :

ip dhcp exclude 192.168.1.40 192.168.1.72
How to disable DHCP

Connect to the router -> enable mode - config mode and type:
no service dhcp

Mac-Windows File sharing & Accessing


In Mac OS X 10.1.x and higher, before you can connect and share files with a Windows computer within your network, you must first create a share folder on the Windows computer. You must also have a local account on that computer. Then follow the appropriate directions below.

Creating a Windows share folder:

1. In Windows, create a new folder or select an existing one. Right-click the folder, and from the contextual menu, select Properties.

2. Select the Sharing tab, and check the box next to Share this folder or Share this folder on the network.

3. In the "Share name:" field, provide a name for the share and click OK. A one-word name is simpler and reduces the risk of confusion.

Connecting to a Windows computer on the network:


Beginning in Mac OS X 10.2 and continuing with later releases of OS X, you can browse to a Windows computer on your network:

1. With the Finder active, from the Go menu, select Connect to Server... .

2. In OS X 10.3.x and later, in the Connect to Server window, click the Browse button. In the window that opens, you will see a listing of all the available computers (both Macintosh and Windows) on your local network.

In OS X 10.2.x, in the Connect to Server window, if you do not already see a listing of all the available computers on the local network, click the blue triangle next to the "At:" pull-down menu.
3. Browse to and select the computer to which you wish to connect, and double-click its icon or click the Connect button.

4. Enter the workgroup name as well as your username and password for access to the computer. If you do not know the workgroup name, the default will usually work.

Note: You must have a local account on the Windows computer you're attempting to access.
5. From the pull-down menu, select the share you wish to access and then click OK.

In OS X 10.1.x and later, you can simply enter the IP address and share name to connect to a Windows computer:

1. With the Finder active, from the Go menu, select Connect to Server... .

2. In the "Address:" or "Server Address:" field, type smb:// , then the IP address of the Windows computer to which you wish to connect, followed by a forward slash and then the share name, for example: smb://129.79.1.1/share
3. Click Connect. When prompted, supply the workgroup name as well as your Windows local account username and password. If you do not know the workgroup name, the default will usually work.

Note: You must have a local account on the Windows computer you're attempting to access.
4. Click OK, and the shared folder will appear as a network drive mounted on your OS X computer.

Adding your OS X computer to the Windows workgroup:

Optionally, you can add your OS X computer to the Windows workgroup to make it easier to browse directly to the computer:

1. Open Directory Access, which is located in /Applications/Utilities.

2. If the padlock in the lower-left corner is locked, click it to unlock it, and supply your OS X account password.

3. Make sure SMB or SMB/CIFS is checked, highlight that option, and then click the Configure... button.

4. In the "Workgroup:" field, enter the name of your Windows workgroup and then click OK.

Sharing files with a Windows computer:


To access your OS X 10.2.x and later computer from Windows, you must turn on Windows sharing and then connect from the Windows computer.
Turning on Windows sharing in OS X

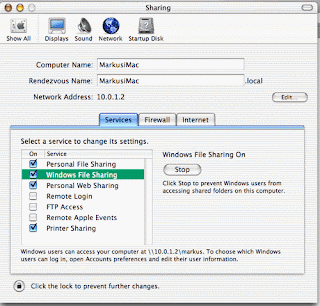
1. From the Apple menu, select System Preferences... .

2. In System Preferences, from the View menu, select Sharing.

3. On the Services tab, check the box next to Windows File Sharing or Windows Sharing to permit access to your OS X computer from a Windows computer.

Note: Any Windows user attempting to access your OS X computer must have an account on your computer and must provide the username and password for that account in order to receive access.

In OS X 10.2.x, you must also complete these steps:

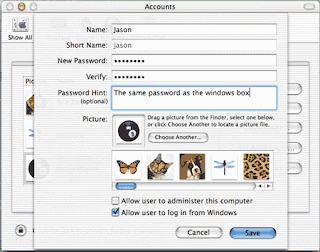
1. In System Preferences, from the View menu, select Accounts.

2. Select the user account to which you wish to grant Windows access, and click Edit User... .

3. Check the box next to Allow user to log in from Windows, and click OK.

Accessing your OS X computer from Windows

Note: You must have an OS X user account in order to access the OS X computer this way.

1. From the Start menu, select Run... .

2. In the "Open:" field, enter the following, replacing the IP address with that of the OS X computer to which you wish to connect and shortname with the short name for the OS X user account: \\129.79.1.1\shortname
3. In the authentication window, enter your OS X user account short name and password.

Usefull RUN commands...

ciadv.msc - indexing service

compmgmt.msc - Computer management

devmgmt.msc - Device manager

dfrg.msc - Disk defragment

diskmgmt.msc - Disk management

eventvwr.msc - Event viewer

fsmgmt.msc - Shared folders

gpedit.msc - Group policies

lusrmgr.msc - Local users and groups

ntmsmgr.msc - removable storage operator request

perfmon.msc - Performance monitor

rsop.msc - Resultant set of policies

secpol.msc - Local security settings

services.msc - Various Services

secpol.msc - local security settings

certmgr.msc - certificate manager

wmimgmt.msc - windows management infrastructure

Thursday, May 1, 2008

Enabling Windows file sharing on the Mac

Step 1 - Allowing Windows XP users to log in to a Mac

Steps:
------


1.To let Windows users access a Mac's "Windows shared files" you are first required to allow Windows users to log into the Mac.
2.Select the "Apple" menu (the icon at the top left of screen) and click the "System Preferences" menu item.
3.When the system preferences window appears, select the "View" menu at the top of the screen and select "Accounts".
4.On the new window that appears select the user who will be making their files available on this machine and then select "Edit User".
5.Check the "Allow user to log in from Windows" checkbox and click "Save".


Step 2 - Enabling "Windows file sharing" on the Mac

"Windows file sharing" itself can now be enabled on the Mac. The service is called "Windows file sharing" simply because it is compatible with the official Microsoft Windows file sharing protocol.


Steps:
-----


1.Select the "Apple" menu (the icon at the top left of screen) and click the "System Preferences" menu item.
2.When the system preferences window appears, select the "view" menu at the top of the screen and select "Sharing".
3.In the "Services" tab of the "Sharing" window select the option "Windows File Sharing".


Your Mac is now set up to share its files with Windows XP PCs, Macs and any other computers with Samba clients.