Saturday, May 10, 2008

Make your dynamic ip into static & Setup Vpn With Dsl Router.

Recently I had problems with VPN because I have DSL router and dynamic ip. And to create VPN you have to have static ip address, so users can access to your VPN server. So first of all there’s a question: how to make my dynamic ip static?
The answer is simple. You visit the site dyndns.org and create yourself an account. Then... you go to services, and select this option:

Dynamic DNS - A free DNS service for those with dynamic IP addresses.


You click on create hosts and then, you write on the blank text area how would you like to call your host. (so users can access your pc hostname)


So... the name is always the same so users can access the vpn server no matter what is the ip address.


how to make your computer VPN server, (in windows XP)?
1. Click Start > Control Panel.
2. In the Control Panel, open the Network Connections > Create New Connection
Then..

3. On the Welcome To The New Connection Wizard page, click Next.
4. On the Network Connection Type page select the Set Up An Advanced Connection option.
5. On the Advanced Connection Options page select the Accept Incoming Connections option and click Next.
6. On the Devices For Incoming Connections page, I don’t need to connect any devices I just click Next.

7. On the Incoming Virtual Private Network (VPN) Connection page, select the Allow Virtual Private Connections option and click Next.

8. On the User Permissions page, select the users that are allowed to make incoming VPN connections. Click Next.

9. On the Networking Software page click on the Internet Protocol (TCP/IP) entry and click the Properties button.

10. Then you select the range of ip addresses you like to assign.

11. On the Completing The New Connection Wizard page, click Finish to create the connection.

There is a slight difference in creating connection in Windows 2003 server, but the main steps are the same.

And the last thing is.. for the user who want to access this VPN server.

How to make a new VPN connection?

1.Click Start, click Control Panel, click Network and Internet Connections, and then click Network Connections.
2.Click Create a new connection, and then click Next.


3.Click Connect to the network at my workplace, and then click Next.
4.Click Virtual Private Network connection, and then click Next.
5.Type a descriptive name for your company, and then click Next.
6. Then on VPN server selection you write the host name of the VPN server
7. Click Finish.

And that’s it. This worked for me. Thanks to the dyndns.org I solved the problem.

Friday, May 2, 2008

Cisco IOS Commands


Q.How do I telnet to the router?


Choose "Start" -> "Run" and type:
telnet 192.168.1.1


Where 192.168.1.1 is the IP-adresse of the router


Q.How to enable telnet from the outside?

By default routers are configured to accept telnet on port 23 from the inside. In order to get telnet access from the outside, you need to create a NAT entry for this popores.

Connect to the router -> enable -> config. Type:

ip nat ins sou sta tcp 192.168.1.1 23 int dialer0 23000

Now you have outside telnet access on port 23000. NB. This also makes your router more open for hacker attack.


Q.How to go into privileged (enable) mode?

Connect to the router. After the initial password you are in user mode. The prompt will like Router>. This mode is mostly used to view statistics, though it is also a stepping-stone for logging into more privileged mode. You can only view and change the configuration of a Cisco router in privileged mode, which you enter by typing:

enable or en

After a succesfull login the prompt will have changed to Router#

To end Priviliged mode type:

disable


Q.How to go into configuration mode?
Connect to the router -> enable and type:

configure terminal or conf t

To end the config mode press +Z (^Z).

Remember to save any changes that are made by typing: write


Q.How to restart the router?

Connect to the router, go to enable mode and type:
reload

Press enter when prompted to confirm.


Q.How to view the configuration?

In enable mode type:

sh run or wr t


Q.How to configure timeout?
Connect to the router -> enable -> Config mode, type:


int dialer0
time abs


Q.How to change password ?

Connect to the router -> enable -> Config mode, type:

line vty 0 4
password
line con 0
password

To change the Enable password:

no enable secret
enable secret

Q.How to see the actual line speed?

Connect to the router and type:

sh dsl int atm0

How to see the external IP adresse
Connect to the router and type:

sh ip in br dial0


Q.How to set the time?
Connect to the router -> enable mode and type:

clock set 10:17:00 14 june 2001

The format is "hh:mm:ss day month year". NB. clock set ? does not show the correct format.


Q.How to run a HotLine server?
In config mode type :

ip nat ins sou sta tcp w.x.y.z 5500 int dialer0 5500
ip nat ins sou sta tcp w.x.y.z 5501 int dialer0 5501
ip nat ins sou sta tcp w.x.y.z 5502 int dialer0 5502
ip nat ins sou sta tcp w.x.y.z 5503 int dialer0 5503

Hvor w.x.y.z is the internal IP.


Q.How to view the NAT entries?
Connect to the router and type:

sh ip nat trans


How to add NAT entries?
Connect to the router -> enable -> Config mode. The format is:

ip nat inside source static interface dialer0

Protocol is either tcp or udp. I.e. a NAT entry for port 4000 to 192.168.1.10 is done by typing:

ip nat inside source static tcp 192.168.1.10 4000 interface dialer0 4000


Q.How to remove NAT entries?
Connect to the router -> enable mode -> Config mode. The format is:

no ip nat inside source static interface dialer0

I.e. the NAT entry for port 4000 to 192.168.1.10 removed by:

no ip nat inside source static tcp 192.168.1.10 4000 interface dialer0 4000

In some cases the command above will not be succesfull, because the entry is in use. If this is the case type the following before going into config mode.

clear ip nat translation *

Q.How to disable NAT and use multible external addresses?
To enable an external ip range - i.e. 212.52.72.184 - 191. Connect to the router -> enable mode -> Config mode and type:

int eth0
ip address 212.52.72.185 255.255.255.248

(Change the ip number to the external numbers that is desired)

end
write
reload

Login again and delete the access list that controls the access inside out
(decide what IP's that is given access through the router), in config mode:

no access-list 1
access-list 1 permit 212.52.72.184 0.0.0.255

Notice the subnet mask 0.0.0.255 is opposite and equals 255.255.255.0

To disable NAT completely on the inside

no ip nat inside
end
write
reload


This satisfy the requirement from some firewalls that the routers ip address have to be on the same network as the wan link on the firewall. Trafic to DMZ and firewall is now going directly through the router to the firewall.


Q.How to change the address where external traffic is routed to...!

By default most routers will route all external traffic to 192.168.1.2. If this is needs to be change to somethin else i.e. a firewall address. Connect to the router - > enable mode and type:

clear ip nat translation *
configure terminal
no ip nat inside source static 192.168.1.2
ip nat inside source static 192.168.0.2
write
reload

Q.How to copy configuration to a TFTP server?

Connect to the router -> enable mode

copy nvram tftp://xx.xx.xx.xx/config.cfg

This saves a configuration file to the TFTP server at ip xx.xx.xx.xx


Q.How to copy configuration from a TFTP server?

Connect to the router -> enable mode

copy tftp://xx.xx.xx.xx/config.cfg nvram

This loads a configuration file to the TFTP server at ip xx.xx.xx.xx


How to remove a configuration

Connect to the router -> enable mode

delete nvram

This removes all configuration parameters and returns the router/switch to factory default settings.


Q.How to back up the Cisco IOS?

Connect to the router -> enable mode and type :

sh flash

This will show the files stored in the flash memory.

System flash directory:
File Length Name/status
1 3641684 soho70-y1-mz.123-6.bin
[3641748 bytes used, 4746860 available, 8388608 total]
8192K bytes of processor board System flash (Read/Write)

In this case an image called soho70-y1-mz.123-6.bin

To back up this file type:

copy flash tftp://192.168.1.2/xxxxx.bin
Source filename [soho70-y1-mz.123-6.bin]?
Address or name of remote host [192.168.1.2]?
Destination filename [xxxxx.bin]?

Where 192.168.1.2 is the ip-address of the tftp server. When prompted for the source file name type the file name found using the sh flash command. xxxxxx.bin will be the file name the IOS is stored under on the server.


Q.How to restore or upgrade the Cisco Router IOS?

Connect to the router -> enable mode and type :

copy tftp://192.168.1.2/xxxxx.bin flash
Destination filename [xxxxx.bin]?
Accessing tftp://192.168.1.2/xxxxx.bin...

Where 192.168.1.2 is the ip-address of the tftp server and xxxxx.bin is the image in the tftp root. If you do not have enough room in the flash memory to store both copies the router will ask to erase the contents of the flash before writing the new file to the memory.


Q.How to set community strings?

Connect to the router -> enable mode - config mode and type:

snmp-server community XXXXX RO
snmp-server location YYYY
snmp-server contact ZZZZ
snmp-server enable traps tty

Where XXXXX is the community name that the software which is collecting the SNMP trap must use. YYYY and ZZZZ are optional.


Q.How to delete community strings?

Connect to the router -> enable mode - config mode and type:

no snmp-server community XXXXX RO


Q.How to limit the DHCP scope?

There are 2 ways to do this. The first and most difficult is done by connecting to the router -> enable mode - config mode and type:

ip dhcp pool
network
default-router
dns-server 212.54.64.170 212.54.64.171
lease 0 1

Default the routers IP is 192.168.1.1.

I.e. you only want to use the following address pool 192.168.1.32-192.168.1.63 (Not include).
The you have to change to 192.168.1.32 and tol 255.255.255.224.

This page can used to help you calculating the subnet for you address pool: Subnet calculator.

The second and much easier way is just to reserve some address in the existing DHCP scope. I.e. you don't want to use the IP from 192.168.1.40 tol 192.168.1.72. In config mode type :

ip dhcp exclude 192.168.1.40 192.168.1.72
How to disable DHCP

Connect to the router -> enable mode - config mode and type:
no service dhcp

Mac-Windows File sharing & Accessing


In Mac OS X 10.1.x and higher, before you can connect and share files with a Windows computer within your network, you must first create a share folder on the Windows computer. You must also have a local account on that computer. Then follow the appropriate directions below.

Creating a Windows share folder:

1. In Windows, create a new folder or select an existing one. Right-click the folder, and from the contextual menu, select Properties.

2. Select the Sharing tab, and check the box next to Share this folder or Share this folder on the network.

3. In the "Share name:" field, provide a name for the share and click OK. A one-word name is simpler and reduces the risk of confusion.

Connecting to a Windows computer on the network:


Beginning in Mac OS X 10.2 and continuing with later releases of OS X, you can browse to a Windows computer on your network:

1. With the Finder active, from the Go menu, select Connect to Server... .

2. In OS X 10.3.x and later, in the Connect to Server window, click the Browse button. In the window that opens, you will see a listing of all the available computers (both Macintosh and Windows) on your local network.

In OS X 10.2.x, in the Connect to Server window, if you do not already see a listing of all the available computers on the local network, click the blue triangle next to the "At:" pull-down menu.
3. Browse to and select the computer to which you wish to connect, and double-click its icon or click the Connect button.

4. Enter the workgroup name as well as your username and password for access to the computer. If you do not know the workgroup name, the default will usually work.

Note: You must have a local account on the Windows computer you're attempting to access.
5. From the pull-down menu, select the share you wish to access and then click OK.

In OS X 10.1.x and later, you can simply enter the IP address and share name to connect to a Windows computer:

1. With the Finder active, from the Go menu, select Connect to Server... .

2. In the "Address:" or "Server Address:" field, type smb:// , then the IP address of the Windows computer to which you wish to connect, followed by a forward slash and then the share name, for example: smb://129.79.1.1/share
3. Click Connect. When prompted, supply the workgroup name as well as your Windows local account username and password. If you do not know the workgroup name, the default will usually work.

Note: You must have a local account on the Windows computer you're attempting to access.
4. Click OK, and the shared folder will appear as a network drive mounted on your OS X computer.

Adding your OS X computer to the Windows workgroup:

Optionally, you can add your OS X computer to the Windows workgroup to make it easier to browse directly to the computer:

1. Open Directory Access, which is located in /Applications/Utilities.

2. If the padlock in the lower-left corner is locked, click it to unlock it, and supply your OS X account password.

3. Make sure SMB or SMB/CIFS is checked, highlight that option, and then click the Configure... button.

4. In the "Workgroup:" field, enter the name of your Windows workgroup and then click OK.

Sharing files with a Windows computer:


To access your OS X 10.2.x and later computer from Windows, you must turn on Windows sharing and then connect from the Windows computer.
Turning on Windows sharing in OS X

1. From the Apple menu, select System Preferences... .

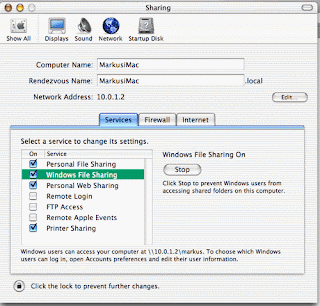
2. In System Preferences, from the View menu, select Sharing.

3. On the Services tab, check the box next to Windows File Sharing or Windows Sharing to permit access to your OS X computer from a Windows computer.

Note: Any Windows user attempting to access your OS X computer must have an account on your computer and must provide the username and password for that account in order to receive access.

In OS X 10.2.x, you must also complete these steps:

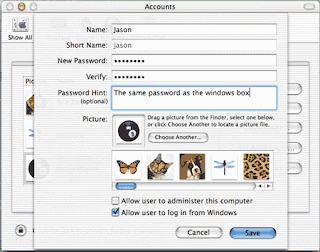
1. In System Preferences, from the View menu, select Accounts.

2. Select the user account to which you wish to grant Windows access, and click Edit User... .

3. Check the box next to Allow user to log in from Windows, and click OK.

Accessing your OS X computer from Windows

Note: You must have an OS X user account in order to access the OS X computer this way.

1. From the Start menu, select Run... .

2. In the "Open:" field, enter the following, replacing the IP address with that of the OS X computer to which you wish to connect and shortname with the short name for the OS X user account: \\129.79.1.1\shortname
3. In the authentication window, enter your OS X user account short name and password.

Usefull RUN commands...

ciadv.msc - indexing service

compmgmt.msc - Computer management

devmgmt.msc - Device manager

dfrg.msc - Disk defragment

diskmgmt.msc - Disk management

eventvwr.msc - Event viewer

fsmgmt.msc - Shared folders

gpedit.msc - Group policies

lusrmgr.msc - Local users and groups

ntmsmgr.msc - removable storage operator request

perfmon.msc - Performance monitor

rsop.msc - Resultant set of policies

secpol.msc - Local security settings

services.msc - Various Services

secpol.msc - local security settings

certmgr.msc - certificate manager

wmimgmt.msc - windows management infrastructure

Thursday, May 1, 2008

Enabling Windows file sharing on the Mac

Step 1 - Allowing Windows XP users to log in to a Mac

Steps:
------


1.To let Windows users access a Mac's "Windows shared files" you are first required to allow Windows users to log into the Mac.
2.Select the "Apple" menu (the icon at the top left of screen) and click the "System Preferences" menu item.
3.When the system preferences window appears, select the "View" menu at the top of the screen and select "Accounts".
4.On the new window that appears select the user who will be making their files available on this machine and then select "Edit User".
5.Check the "Allow user to log in from Windows" checkbox and click "Save".


Step 2 - Enabling "Windows file sharing" on the Mac

"Windows file sharing" itself can now be enabled on the Mac. The service is called "Windows file sharing" simply because it is compatible with the official Microsoft Windows file sharing protocol.


Steps:
-----


1.Select the "Apple" menu (the icon at the top left of screen) and click the "System Preferences" menu item.
2.When the system preferences window appears, select the "view" menu at the top of the screen and select "Sharing".
3.In the "Services" tab of the "Sharing" window select the option "Windows File Sharing".


Your Mac is now set up to share its files with Windows XP PCs, Macs and any other computers with Samba clients.

Usefull commands in Winxp.....

Useful Run Commands for Windows


Accessibility Controls -access.cpl

Add Hardware Wizard-hdwwiz.cpl

Add/Remove Programs-appwiz.cpl

Administrative Tools-control admintools

Automatic Updates-wuaucpl.cpl

Bluetooth Transfer Wizard-fsquirt
Calculator-calc

Certificate Manager-certmgr.ms
Character Map-charmap

Check Disk Utility-chkdsk

Clipboard Viewer-clipbrd

Command Prompt-cmd

Component Services-dcomcnfg

Computer Management-compmgmt.msc

Date and Time Properties-timedate.cpl

DDE Shares-ddeshare

Device Manager-devmgmt.msc

Direct X Control Panel (If Installed)-directx.cpl

Direct X Troubleshooter-dxdiag

Disk Cleanup Utility-cleanmgr

Disk Defragment-dfrg.msc

Disk Management-diskmgmt.msc

Disk Partition Manager-diskpart

Display Properties-control desktop

Display Properties-desk.cpl

Display Properties (w/Appearance Tab Preselected)-control color

Dr. Watson System Troubleshooting Utility-drwtsn32

Driver Verifier Utility-verifier

Event Viewer-eventvwr.msc

File Signature Verification Tool-sigverif

Findfast-findfast.cpl

Folders Properties-control folders

Fonts-control fonts

Fonts Folder-fonts

Free Cell Card Game-freecell

Game Controllers-joy.cpl

Group Policy Editor (XP Prof)-gpedit.msc

Hearts Card Game-mshearts
Iexpress Wizard-iexpress
Indexing Service-ciadv.msc

Internet Properties-inetcpl.cpl

IP Configuration (Display Connection Configuration)-ipconfig /all

IP Configuration (Display DNS Cache Contents)-ipconfig /displaydns

IP Configuration (Delete DNS Cache Contents)-ipconfig /flushdns

IP Configuration (Release All Connections)-ipconfig /release

IP Configuration (Renew All Connections)-pconfig /renew

IP Configuration (Refreshes DHCP & Re-Registers DNS)-ipconfig /registerdns

IP Configuration (Display DHCP Class ID)-ipconfig /showclassid

IP Configuration (Modifies DHCP Class ID)-ipconfig /setclassid

Java Control Panel (If Installed)-jpicpl32.cpl

Java Control Panel (If Installed)-javaws

Keyboard Properties-control keyboard

Local Security Settings-secpol.msc

Local Users and Groups-lusrmgr.msc

Logs You Out Of Windows-logoff

Microsoft Chat-winchat

Minesweeper Game-winmine

Mouse Properties-control mouse

Mouse Properties-main.cpl

Network Connections-control netconnections

Network Connections-ncpa.cpl

Network Setup Wizard-netsetup.cpl

Notepad-notepad

Nview Desktop Manager(If Installed)-nvtuicpl.cpl

Object Packager-packager

ODBC Data Source Administrator-odbccp32.cpl

On Screen Keyboard-osk

Opens AC3 Filter (If Installed)-ac3filter.cpl

Password Properties-password.cpl

Performance Monitor-perfmon.msc

Performance Monitor-perfmon

Phone and Modem Options-telephon.cpl

Power Configuration-powercfg.cpl

Printers and Faxes-control printers

Printers Folder-printers

Private Character Editor-eudcedit

Quicktime (If Installed)-QuickTime.cpl

Regional Settings-intl.cpl

Registry Editor-regedit

Registry Editor-regedit32

Remote Desktop-mstsc

Removable Storage-ntmsmgr.msc

Removable Storage Operator Requests-ntmsoprq.msc

Resultant Set of Policy (XP Prof)-rsop.msc

Scanners and Cameras-sticpl.cpl

Scheduled Tasks-control schedtasks

Security Center-wscui.cpl

Services-services.msc

Shared Folders-fsmgmt.msc

Shuts Down Windows-shutdown

Sounds and Audio-mmsys.cpl

Spider Solitare Card Game-spider

SQL Client Configuration-cliconfg

System Configuration Editor-sysedit

System Configuration Utility-msconfig

System File Checker Utility (Scan Immediately)-sfc /scannow

System File Checker Utility (Scan Once At Next Boot)-sfc /scanonce

System File Checker Utility (Scan On Every Boot)-sfc /scanboot

System File Checker Utility (Return to Default Setting)-sfc /revert

System File Checker Utility (Purge File Cache)-sfc /purgecache

System File Checker Utility (Set Cache Size to size x)-sfc /cachesize=x

System Properties-sysdm.cpl

Task Manager-taskmgr

Telnet Client-telnet

User Account Management-nusrmgr.cpl

Utility Manager-utilman

Windows Firewall-firewall.cpl

Windows Magnifier-magnify

Windows Management Infrastructure-wmimgmt.msc

Windows System Security Tool-syskey

Windows Update Launches-wupdmgr

Windows XP Tour Wizard-tourstart

Wordpad-write


A-Z Index of the Windows XP command line

ADDUSERS Add or list users to/from a CSV file
ARP Address Resolution Protocol
ASSOC Change file extension associations
ASSOCIAT One step file association
AT Schedule a command to run at a later time
ATTRIB Change file attributes

BOOTCFG Edit Windows boot settings
BROWSTAT Get domain, browser and PDC info

CACLS Change file permissions
CALL Call one batch program from another
CD Change Directory - move to a specific Folder
CHANGE Change Terminal Server Session properties
CHKDSK Check Disk - check and repair disk problems
CHKNTFS Check the NTFS file system
CHOICE Accept keyboard input to a batch file
CIPHER Encrypt or Decrypt files/folders
CleanMgr Automated cleanup of Temp files, recycle bin
CLEARMEM Clear memory leaks
CLIP Copy STDIN to the Windows clipboard.
CLS Clear the screen
CLUSTER Windows Clustering
CMD Start a new CMD shell
COLOR Change colors of the CMD window
COMP Compare the contents of two files or sets of files
COMPACT Compress files or folders on an NTFS partition
COMPRESS Compress individual files on an NTFS partition
CON2PRT Connect or disconnect a Printer
CONVERT Convert a FAT drive to NTFS.
COPY Copy one or more files to another location
CSCcmd Client-side caching (Offline Files)
CSVDE Import or Export Active Directory data

DATE Display or set the date
Dcomcnfg DCOM Configuration Utility
DEFRAG Defragment hard drive
DEL Delete one or more files
DELPROF Delete NT user profiles
DELTREE Delete a folder and all subfolders
DevCon Device Manager Command Line Utility
DIR Display a list of files and folders
DIRUSE Display disk usage
DISKCOMP Compare the contents of two floppy disks
DISKCOPY Copy the contents of one floppy disk to another
DNSSTAT DNS Statistics
DOSKEY Edit command line, recall commands, and create macros
DSADD Add user (computer, group..) to active directory
DSQUERY List items in active directory
DSMOD Modify user (computer, group..) in active directory

ECHO Display message on screen
ENDLOCAL End localisation of environment changes in a batch file
ERASE Delete one or more files
EXIT Quit the CMD shell
EXPAND Uncompress files
EXTRACT Uncompress CAB files

FC Compare two files
FDISK Disk Format and partition
FIND Search for a text string in a file
FINDSTR Search for strings in files
FOR /F Loop command: against a set of files
FOR /F Loop command: against the results of another command
FOR Loop command: all options Files, Directory, List
FORFILES Batch process multiple files
FORMAT Format a disk
FREEDISK Check free disk space (in bytes)
FSUTIL File and Volume utilities
FTP File Transfer Protocol
FTYPE Display or modify file types used in file extension associations

GLOBAL Display membership of global groups
GOTO Direct a batch program to jump to a labelled line

HELP Online Help
HFNETCHK Network Security Hotfix Checker

IF Conditionally perform a command
IFMEMBER Is the current user in an NT Workgroup
IPCONFIG Configure IP

KILL Remove a program from memory

LABEL Edit a disk label
LOCAL Display membership of local groups
LOGEVENT Write text to the NT event viewer.
LOGOFF Log a user off
LOGTIME Log the date and time in a file

MAPISEND Send email from the command line
MEM Display memory usage
MD Create new folders
MKLINK Create a symbolic link (linkd)
MODE Configure a system device
MORE Display output, one screen at a time
MOUNTVOL Manage a volume mount point
MOVE Move files from one folder to another
MOVEUSER Move a user from one domain to another
MSG Send a message
MSIEXEC Microsoft Windows Installer
MSINFO Windows NT diagnostics
MSTSC Terminal Server Connection (Remote Desktop Protocol)
MUNGE Find and Replace text within file(s)
MV Copy in-use files

NET Manage network resources
NETDOM Domain Manager
NETSH Configure network protocols
NETSVC Command-line Service Controller
NBTSTAT Display networking statistics (NetBIOS over TCP/IP)
NETSTAT Display networking statistics (TCP/IP)
NOW Display the current Date and Time
NSLOOKUP Name server lookup
NTBACKUP Backup folders to tape
NTRIGHTS Edit user account rights

PATH Display or set a search path for executable files
PATHPING Trace route plus network latency and packet loss
PAUSE Suspend processing of a batch file and display a message
PERMS Show permissions for a user
PERFMON Performance Monitor
PING Test a network connection
POPD Restore the previous value of the current directory saved by PUSHD
PORTQRY Display the status of ports and services
PRINT Print a text file
PRNCNFG Display, configure or rename a printer
PRNMNGR Add, delete, list printers set the default printer
PROMPT Change the command prompt
PsExec Execute process remotely
PsFile Show files opened remotely
PsGetSid Display the SID of a computer or a user
PsInfo List information about a system
PsKill Kill processes by name or process ID
PsList List detailed information about processes
PsLoggedOn Who's logged on (locally or via resource sharing)
PsLogList Event log records
PsPasswd Change account password
PsService View and control services
PsShutdown Shutdown or reboot a computer
PsSuspend Suspend processes
PUSHD Save and then change the current directory

QGREP Search file(s) for lines that match a given pattern.

RASDIAL Manage RAS connections
RASPHONE Manage RAS connections
RECOVER Recover a damaged file from a defective disk.
REG Registry: Read, Set, Export, Delete keys and values
REGEDIT Import or export registry settings
REGSVR32 Register or unregister a DLL
REGINI Change Registry Permissions
REM Record comments (remarks) in a batch file
REN Rename a file or files.
REPLACE Replace or update one file with another
RD Delete folder(s)
RDISK Create a Recovery Disk
RMTSHARE Share a folder or a printer
ROBOCOPY Robust File and Folder Copy
ROUTE Manipulate network routing tables
RUNAS Execute a program under a different user account
RUNDLL32 Run a DLL command (add/remove print connections)

SC Service Control
SCHTASKS Create or Edit Scheduled Tasks
SCLIST Display NT Services
ScriptIt Control GUI applications
SET Display, set, or remove environment variables
SETLOCAL Control the visibility of environment variables
SETX Set environment variables permanently
SHARE List or edit a file share or print share
SHIFT Shift the position of replaceable parameters in a batch file
SHORTCUT Create a windows shortcut (.LNK file)
SHOWGRPS List the NT Workgroups a user has joined
SHOWMBRS List the Users who are members of a Workgroup
SHUTDOWN Shutdown the computer
SLEEP Wait for x seconds
SOON Schedule a command to run in the near future
SORT Sort input
START Start a separate window to run a specified program or command
SU Switch User
SUBINACL Edit file and folder Permissions, Ownership and Domain
SUBST Associate a path with a drive letter
SYSTEMINFO List system configuration

TASKLIST List running applications and services
TIME Display or set the system time
TIMEOUT Delay processing of a batch file
TITLE Set the window title for a CMD.EXE session
TOUCH Change file timestamps
TRACERT Trace route to a remote host
TREE Graphical display of folder structure
TYPE Display the contents of a text file

USRSTAT List domain usernames and last login

VER Display version information
VERIFY Verify that files have been saved
VOL Display a disk label

WHERE Locate and display files in a directory tree
WHOAMI Output the current UserName and domain
WINDIFF Compare the contents of two files or sets of files
WINMSD Windows system diagnostics
WINMSDP Windows system diagnostics II
WMIC WMI Commands

XCACLS Change file permissions
XCOPY Copy files and folders